What Should You Be Using In Your Skin Care Routine?
Take my quiz and get personalized recommendations from a
licensed esthetician!
How to Have Flawless & Break-Out Free Halloween Make Up
Halloween is the best time to play dress-up, transform yourself, and step out of your comfort zone. If you’re like me, you love to go all out and create a very intricate makeup look, be it ethereal, freaky, or cutesy. Each year I am asked about Halloween makeup, and my take on how they affect our skin, which is why I want to share some of my thoughts, tips, and tricks with you, in an effort to achieve beautiful, happy, post-Halloween skin. So, are you ready for it?
First: it is incredibly important to realize that most of the makeup kits sold for Halloween are actually clay or paint based. They are incredibly thick in consistency, meaning any type of sweating
Remaining Breakout Free on Halloween
My first and best suggestion would be to create your looking with good for your skin makeup. Creating a festive Halloween makeup look is much easier than people assume with mineral makeup – loose minerals are particularly great for this! For instance: creating a realistic mermaid look? Sub Youngblood’s Crushed Eyeshadow in Azurite for your aquamarine/green colored face paint. Though this product is primarily an eyeshadow, it can be mixed with water, lip gloss, nail polish, and much more to create a gorgeous shade that will not wreak havoc on your skin! While pressed mineral shadows can also work, I definitely recommend sticking to a loose mineral to save on product. Remember: we are talking about high quality mineral makeup products, such as those sold by La Bella Donna, Youngblood, Glo Minerals, and Mirabella. Non-mineral, department store brands may cause the same amount of damage as traditional face paints, which is why I do not suggest using them in place of them.
Second, it is crucial to stick with your normal skin care regimen when doing a full-face look:
- Start with cleansed and moisturized skin.
- Use a primer to hold the make up on your face.
- Apply the make up with clean make up brushes and clean brushes thoroughly after application.
- If your look requires a Halloween makeup kit, try using an oil-free kit.
- Set the make up after you use it to prevent it from sweating off and having to reapply. Model in a Bottle Makeup Setting Spray is the perfect product for this!
- After the night is over, cleanse your skin (twice) to ensure that your skin is fresh and makeup-free.
- Tone your skin to remove any excess makeup, dirt, or oil.
- Indulge in a facemask or moisturizer before bed to calm the skin.
Fun & Easy Makeup Looks
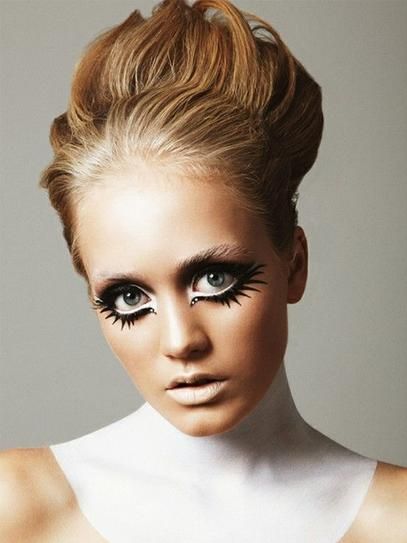
The images below were pulled from Pinterest. These are looks that I have enjoyed recreating on my own. The women and makeup in the photos did not use the same products or steps I did to mimic the look. However, I wanted to share the steps I took to achieve them
Step 1: Apply your usual base makeup
Step 2: Use Youngblood Eye-Illuminating Duo or a white mineral eyeshadow to line around your eyes, emphasizing the inner corners.
Step 3: Grab your graphic liner and create dramatic lash-like lines to emulate that twiggy-chic eyelash look.
Optional: You can take this look even further by playing up the brows and highlighting your forehead and the tip of your nose.
Step 1: Create your canvas by applying your usual base and contour.
Step 2: Play up your lips with your favorite shade. I like anything dramatic for this look.
Step 3: Go Graphic, emphasizing your brows, eyeliner, cheekbones, jawline, lip lines, nose creases, and more with your favorite liquid liner. Pencil liner works as well, but I found it to be less budge-proof.
Step 4: Pixelate your skin with a mineral lip liner or eyeliner color of your choice! I went with Glo Minerals Precise Micro Lipliner in Pale Magenta.
Step 5: Add a highlight to your lip for as a finishing touch! You can use a white eyeshadow or the Youngblood Eye-Illuminating Duo discussed above.
Step 1: Create your usual base.
Step 2: Select a lip color of your choice. I went with a magenta pink.
Step 3: Work your eyeliner to outline your lips, create whiskers, and create your kitty nose. Don’t forget to create a beautiful cat eye
Step 4: Play up your brow game! I like to use my Youngblood Eye-Illuminating Duo to emphasize my brows with an under-brow highlight.
Step 5: Stick your cat ears one and voila!
 Take ‘Cat Eyes’ to the Next Level
Step 1: Select a crease color and apply! I initially went with a darker purple, but found brighter colors to create a better contrast for the cat.
Step 2: Highlight under your brows and blend into your crease.
Step 3: Use your liner a create a cat on your eyelid, and curve your outer corners up to fill in your brows for the tail.
Step 4: Line your lower lashes if you please, and apply your mascara!
Embellishments: These were the last step of the process for me. I used light dabs of lash glue to adhere my cat eyes and string. Be sure to do a test dot of the glue to make sure it agrees with your skin, and remove very carefully with makeup remover, as the skin beneath your eye is extra delicate.
Top Brands
New Brands

Recent Posts

Are You Taking the Right Steps to Care for Your Skin?
Take the Quiz
Skincare Secrets!
10-step guide for healthy, beautiful skin after kids.
100% privacy. I will never spam you!


